Popular Video Conferencing Apps
Due to ongoing Covid-19 Pandemic teachers and students around the globe are using different video conferencing apps for online classes. A bunch of video conferencing apps are there but some of the most popular apps are:- Zoom
- Google Meet
- Microsoft Teams
- Cisco Webex
- Skype Meet Now
This tutorial provides
Google Meet
Google Meet is a type of video conferencing App. It is the new version of both
Google Hangouts and Google Chat. It was initially released in 2017.
Directly accessible on PC using website
meet.googl.com and
its app is available for both Android phone an iPhone.
Initially Google launched it as a commercial service but later
made it available for free users as well. These days, during Covid-19 pandemic
it is the top competitor for the Zoom.
Zoom VS Google Meet
Currently, Zoom and Google Meet are most widely used. Both have awesome
features. Lets compare basic features of both apps.
1. Desktop App
Unlike Zoom, Google Meet is not available in desktop app. But its app
is available for iPhone and Android.
2. Downloads on Playstore
Currently zoom app is downloaded 100 M+ times, while Google Meet is 50
M+ times on playstore.
3. Time limit
Video call made through Google Meet currently has 24 hours time limit
upto September 30, 2020, While Zoom has 40 time limit.
4. Participants
Zoom supports 100 participants, while Google Meet supports
250 participants for video calling.
5. Security
5. Security
Unlike zoom, Google meet provides end-to-end encryption on all call.
That's why Meet is more secure than zoom.
6. Recording
Zoom allows to record meeting in MP4 format and can be stored locally
on computer. But Google Meet doesn't support recording feature.
7. Participants on screen
Zoom allows 49 participants on main screen while Google Meet allows
16.
8. Screen Sharing
Both Zoom and Google Meet support screen sharing with
participants.
9. Virtual Background
Unlike Meet, Zoom provides this awesome feature in which the host
display an image or video on his own choice during meeting as a
background.
10. Real-Time Captions
Unlike Zoom, Google Meet provides real time speech to text conversion
in English language shared on screen during meeting.
Quick Comparisons of Both Apps
| S. No | Feature | Google Meet |
Zoom |
| 1 |
Desktop App |
No |
Yes |
| 2 | Downloads |
50 M+ |
100 M+ |
| 3 | Time Limit | 120 mins |
40 mins |
| 4 | Participants | 250 | 100 |
| 5 | Security | Yes | No |
| 6 | Recording | No | Yes |
| 7 | Participants on screen | 16 | 49 |
| 8 | Screen Sharing | Yes | Yes |
| 9 | Virtual Background | No | Yes |
| 10 | Real-Time Capitations | Yes | No |
Why Google Meet?
Both apps have their own features for video calling, but Meet has
some preference over Zoom, like:
1. Integration
It is integrated with other Google products such as
Gmail and Google Calendar.
2. Convenience
Directly accessible through Gmail account, No need to
install software. Even new meeting can be started from the Gmail inbox.
3. Background Noise
Google has roll out background noise during meeting.
4. Real-Time captions
Real-time speech to text conversion on screen shared with all
participants, is a unique feature of Meet.
5. Interface
It has a simple and user friendly interface to use and understand.
6. Inviting participants
Inviting participants through sharing joining link is very easy and
one step process. Copy the joining link and share.
7. Screen Sharing
Meet allows the host to share the entire screen with the
participants. Which enables host to share any file on screen
during meeting.
Step by Step Teachers Guide
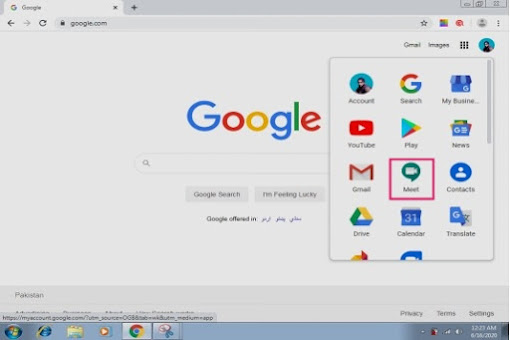
1. Open Google chrome browser and click on dotted button next to
images.
2. Click on the Meet in the drop down menu.
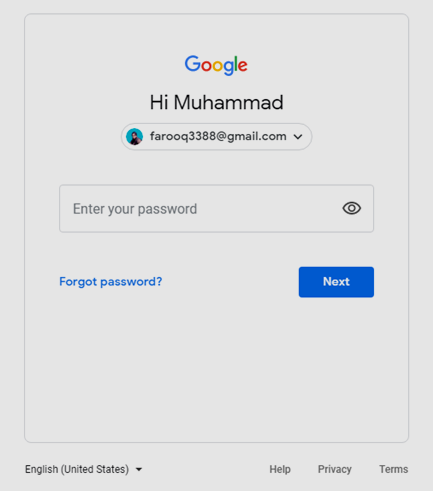
3. Click on your Name(Gmail ID) to access Google account.
4. Enter you Password and Click Next button.
3. Click on Start a meeting button to enter into new
meeting.
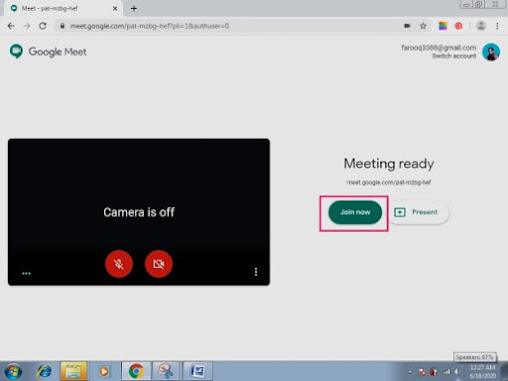
4. Click on the Join now button.
5. Click on Copy joining info to copy the joining link to
invite students to the meeting by sharing link with them using any
messenger.
6. The Google Meet window will be opened.
Step by Step Students Guide
1.Shared link
Click the joining link shared by the teacher.
2. Join Meeting
Click Join now button.
3. Approval from the teacher
As the student click on the join now button, request is send to the teacher to admit you in the meeting. As the teacher click
the Admit option meeting window is opened to that
student.
4. Mute mice
It should be noticed that during the meeting every student should mute his/her mice to listen clearly to the teacher. When student wanna ask
something, then he/she should unmute the mice.
Main Features
Some of the main features of Google Meet are:
1. Inviting Students
Click Meeting detail to copy the joining link and share with
the student to join the meeting. The student have to sign in into
Google account to join meeting.
2. Audio Streaming
Click the Microphone button to mute or unmute the audio
streaming.
3. Leave Meeting
Click the red Phone button to close the meeting.
4. Live video streaming
Click the Camera button to on or off video streaming.
5. Captions
Click on Turn on captions to start speech to text
conversion on screen in English language . To stop captioning click on
Turn off captions.
6. Screen sharing
The most import feature for teachers to share screen with the
students.
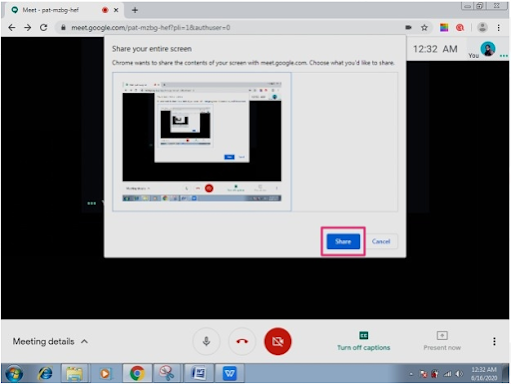
- Click on the Present button and then on your entire screen option.
2. Click on the appeared screen and
then click the Share button. Now your entire screen is shared with the students. You can share any file with the students on the shared screen.
3. Click the
Stop sharing button to stop sharing screen and move back to the main meeting screen.

7. Participants
Click on People button to show the list of meeting
participants.
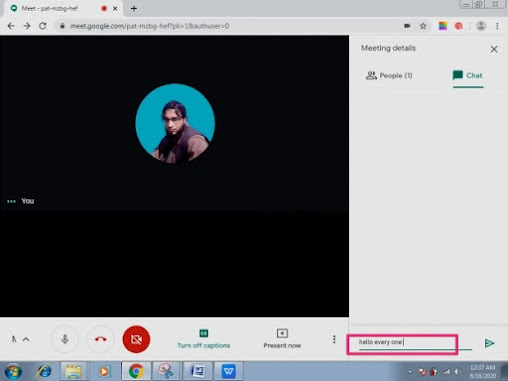
8. Chat
Click on Chat button to send text messages to all the
students.
9. Remove participant
If you want to remove any participant from the meeting. Then click
on that participant in the participant list and click the first
option to remove.









Very informative :D Thanks for this masterpiece!!!
ReplyDeleteThanks for feedback
DeletemashAllah
ReplyDeleteHafiz sab
Adnan a dera manana rora
DeleteGreat info for the purpose
ReplyDeleteThanks for feedback
DeleteJoining code kia ha
DeleteThank you mr Farooq for providig useful information
ReplyDeletethanks dear for feedback
ReplyDeleteThanks for such nice information
ReplyDeleteThanks for feedback
Delete